
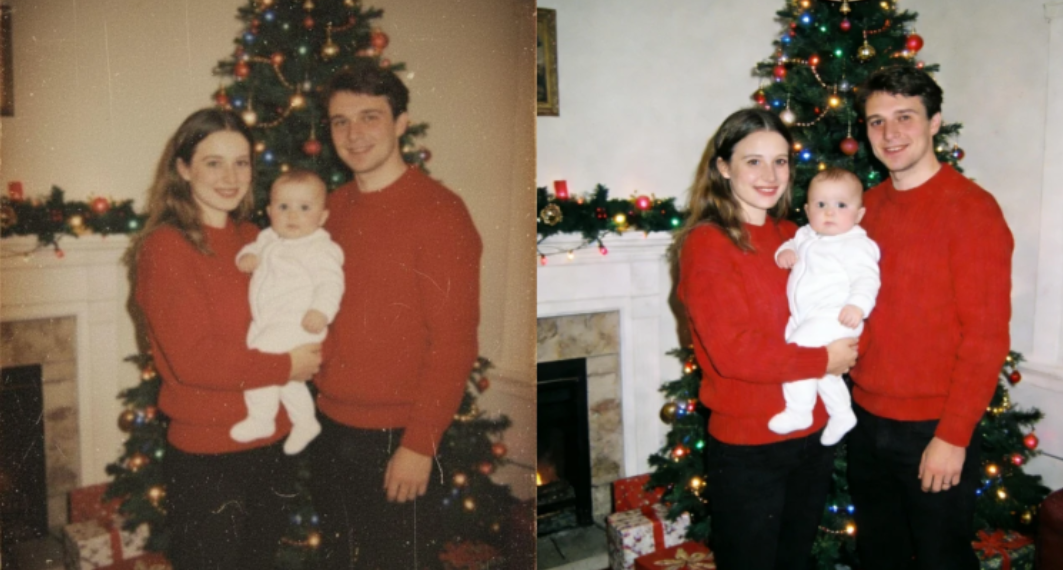
We have all encountered that dusty shoebox in the attic or scrolled through an ancient folder on an old hard drive only to find a visual goldmine: a priceless family photograph. Perhaps it is a picture of your grandparents on their wedding day, a faded memory of a childhood summer, or a rare historic capture of your hometown.
Unfortunately, time is a cruel opponent to physical print photos and early digital images. Sun exposure fades rich pigments, humidity causes paper discoloration, and physical handling leaves scratches, tears, and creases. Even early digital camera shots from two decades ago often suffer from tiny resolutions, aggressive compression, and heavy visual noise.
Until recently, repairing these fading memories required either spending hundreds of dollars at a specialized photo restoration studio or mastering complex desktop editing software like Adobe Photoshop. Today, accessible web-based tools like EzEnhancer.ai have completely democratized photo restoration, allowing anyone to repair, sharpen, and upscale degraded photographs in just a few clicks.
In this comprehensive guide, we will explore how AI photo enhancement works, how to properly digitize physical prints, and how to use modern web tools to rescue your cherished memories.
How AI Photo Enhancers Work: A Quantum Leap Beyond Traditional Editing
To understand why AI photo restoration produces such astounding results, it helps to contrast it with traditional photo editing methods.
Traditional Editing vs. AI Reconstruction
- Traditional Editing (Filters & Sharpening): Older software relies on mathematical adjustments to existing pixels. If an image is blurry or out of focus, pushing the “sharpness” slider merely increases color contrast along pixel edges. While this makes the image look slightly less soft, it also introduces ugly artificial noise, harsh halos, and digital grain. Furthermore, if a physical scratch wipes out part of a person’s face, traditional tools require a human editor to manually stamp and patch pixels from adjacent areas.
- AI Neural Reconstruction: Modern visual tools take a fundamentally different approach. AI photo restoration tools do not just stretch or contrast existing pixels—they understand visual context. Trained on datasets containing millions of high-definition photographs, deep learning algorithms learn the subtle geometry of human anatomy, skin textures, light reflection, and natural landscapes.
When you feed a blurry or damaged image into an AI enhancer, the algorithm analyzes the underlying facial structure, recognizes missing information, and intelligently reconstructs lost details with breathtaking precision.

Key Features of AI Old Photo Restoration
When restoring vintage or degraded images, dedicated AI algorithms perform several complex tasks simultaneously:
1. Smart Scratch, Crease, and Stain Removal
Physical prints often suffer from cracks, fold lines, liquid stains, or dust spots. Specialized restoration models scan the image for surface anomalies that break the logical flow of the background or subject, seamlessly filling in missing areas while preserving authentic texture.
2. Facial Recognition and Detail Sharpening
Faces are the most critical part of any portrait, yet they are usually the first thing to lose detail in blurred or small-scale photos. AI enhancers utilize specialized face-restoration models to sharpen eyes, smooth skin contours, and define hair strands without giving subjects a fake “plastic” look.
3. Automatic Colorization and Tone Balance
Faded color photos often turn harsh shades of yellow or red over time, while black-and-white prints lack the warmth of real life. AI colorization algorithms analyze the light values, shadows, and contextual objects in a monochrome shot—recognizing trees as green, sky as blue, and skin as natural flesh tones—to apply natural, believable color schemes.
4. High-Definition Resolution Upscaling
Old digital photos taken on early smartphones or point-and-shoot cameras often have low resolutions (e.g., 640×480 pixels). AI upscaling uses deep learning to multiply pixel counts by 2x, 4x, or even 8x, transforming tiny web images into crisp 4K visual assets ready for modern display screens or physical canvas printing.
Step-by-Step Guide: Restoring Your Memories Online
Restoring low-quality or damaged prints no longer requires expensive hardware installations or technical editing skills.
By automating scratch detection, facial detail sharpening, and resolution enhancement into an intuitive web browser interface, EzEnhancer.ai makes professional-grade photo recovery accessible to everyone.
Here is the optimal 3-step workflow for achieving professional results at home:
Step 1: Digitize Your Physical Prints Properly
The quality of your digital input directly determines the quality of your AI output.
- Option A (Best): Use a Flatbed Scanner. Scan your prints at 600 DPI (Dots Per Inch) for small photos or 300 DPI for large prints. Save the output as an uncompressed file format like PNG or TIFF rather than a heavily compressed JPEG.
- Option B (Fast): Smartphone Capture. If you do not own a scanner, place the print flat on a table near a window with soft, natural indirect daylight. Never use your camera flash, as direct glare will obscure photo details. Hold your phone completely parallel to the print to avoid geometric distortion.
Step 2: Process Through an AI Photo Enhancer
Upload your digitized file to EzEnhancer.ai. Choose the processing mode tailored for your image:
- Select Restoration / Scratch Removal if dealing with heavily damaged black-and-white prints.
- Select Photo Enhancer / Upscaler if dealing with blurry digital portraits or small-scale images that need clarity and resolution boosts.
Step 3: Review, Adjust, and Export
Once processing is complete, compare the before-and-after preview. Check key focal points like eyes, hands, and textured backgrounds. Download the final high-definition file and store a copy in secure cloud storage to ensure it is preserved forever.
Pro Tips for Maximum Restoration Quality
To ensure your restored images look authentic rather than over-processed, keep these expert tips in mind:
- Do Not Crop Pre-Process: Leave borders intact when uploading your initial scan. Providing the AI model with full environmental context helps it better calculate lighting and perspective.
- Preserve a Touch of Vintage Grain: Film photos naturally possess film grain. When restoring vintage pictures, completely stripping all grain can sometimes make photos look artificially smooth. Retaining a subtle amount of texture preserves historical charm.
- Enhance First, Edit Second: If you plan to make stylistic adjustments (like applying custom color filters or vignettes), always run the image through the AI enhancer first to repair structural clarity before applying creative edits.
Final Thoughts
Photographs are more than paper prints or digital files; they are irreplaceable emotional bridges connecting us to our heritage. In the past, time gradually erased these visual records. Today, intuitive visual platforms enable us to rescue damaged visual history and share vibrant, crystal-clear family heritage with future generations.
Whether you are preparing a meaningful gift for an anniversary, building a digital family archive, or restoring visual assets for creative projects, modern AI photo enhancement is one of the most rewarding applications of consumer technology available today.